Cherry Wine Recipe: How to Make it in 4 Easy Steps
To anyone who ever said ‘life is just a bowl of cherries’ (I’m looking at you, Judy Garland), well, you’ve clearly never tried cherry wine.
For the all-singing, all-dancing wine connoisseur, life is more like a glass of cherries, sweetened and fermented and bursting with flavor and color.
If you love wine, you need to try cherry wine at least once in your life (and this cherry wine recipe in particular). It is not like anything else you’ve ever tasted – full and sweet, yet tangy and bold at the same time.
It is also surprisingly versatile, pairing with meat dishes, Asian flavors, pungent cheese and most desserts.
The only problem is, you’re unlikely to find cherry wine in your local liquor store.
Cherry cola? Sure. Cherry vodka? Probably. Cherry liquor? Perhaps.
But cherry wine has not quite made it into the mainstream yet, so if you want to try it you’re going to have to make it yourself.
Luckily, cherry wine is cheap and easy to make from scratch – the hardest part is probably removing the stones from around 100 tiny fruits – and as long as you choose good quality cherries, you will end up with a fruit wine which you will return to again and again.
This guide will teach you everything you need to know about making cherry wine at home, from the equipment you need, to the cherries you should avoid.
Equipment
You can sterilize your equipment by simply crumbling up a few campden tablets into warm water (one tablet for every gallon used) and leaving your things to soak for at least ten minutes. Rinse them off and allow them to dry naturally, then you’re all set.
- A sterilized brew bin, or a food grade basin with a capacity of at least one gallon.
- 2 glass or plastic demijohns (at least one gallon in size), plus a fitted airlock and bung
- A large straining bag or muslin cloth.
- A vinyl siphon tube (at least 3ft in length).
- 6 glass wine bottles, 6 matching corks, and a good quality corker.
- A large funnel
Optional but fun
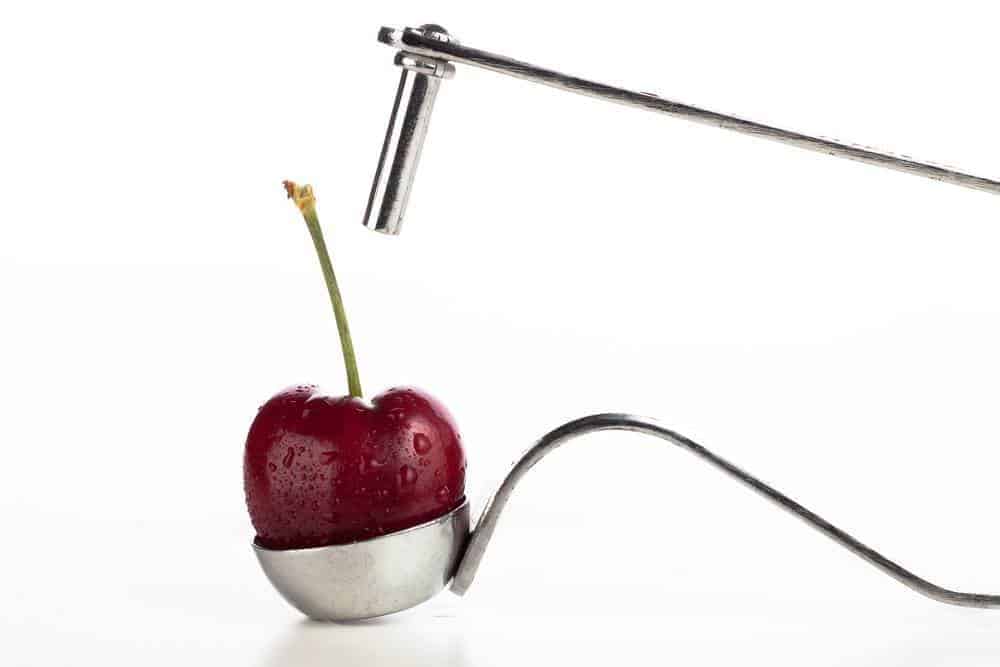
A cherry pitter. I love these little gadgets, which make pitting cherries way more fun than it should be.
Set yourself up with two big bowls (one for the cherry pits and one for the fruit) and get to work while watching your favorite TV show. You can also use cherry pitters for de-stoning olives!
Hydrometer. This is not strictly necessary, but it will help you to work out your final Alcohol by Volume (ABV) reading. They are easy to use, just follow the instructions!
Ingredients
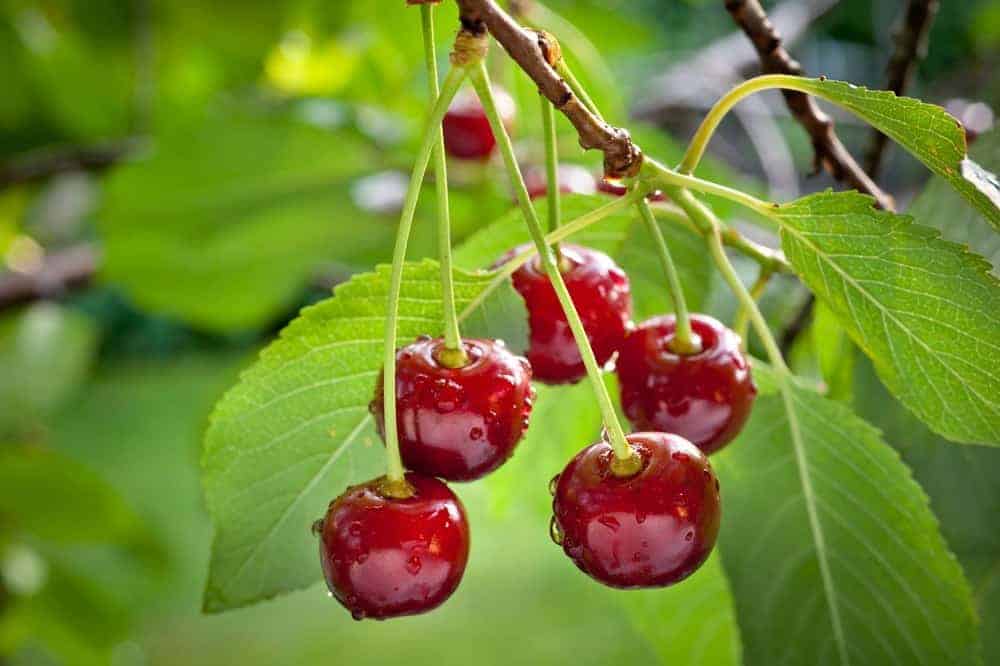
- 6lbs (2.6kg) fresh or frozen cherries, pits and stems removed. For the best tasting wine, try to choose a 50/50mix of sweet and sour cherries.
- 2.5lbs (1.13kg) granulated sugar.
- 1 teaspoon citric acid.
- All-purpose wine yeast . You can also use white wine yeast or red wine yeast in this recipe. Follow the instructions on the packet for details on how much to use.
- Yeast nutrient . Check the packet for instructions on how much you need to use.
- Campden tablets
Our Cherry Wine Recipe
STEP ONE – Cherry picking your ingredients!
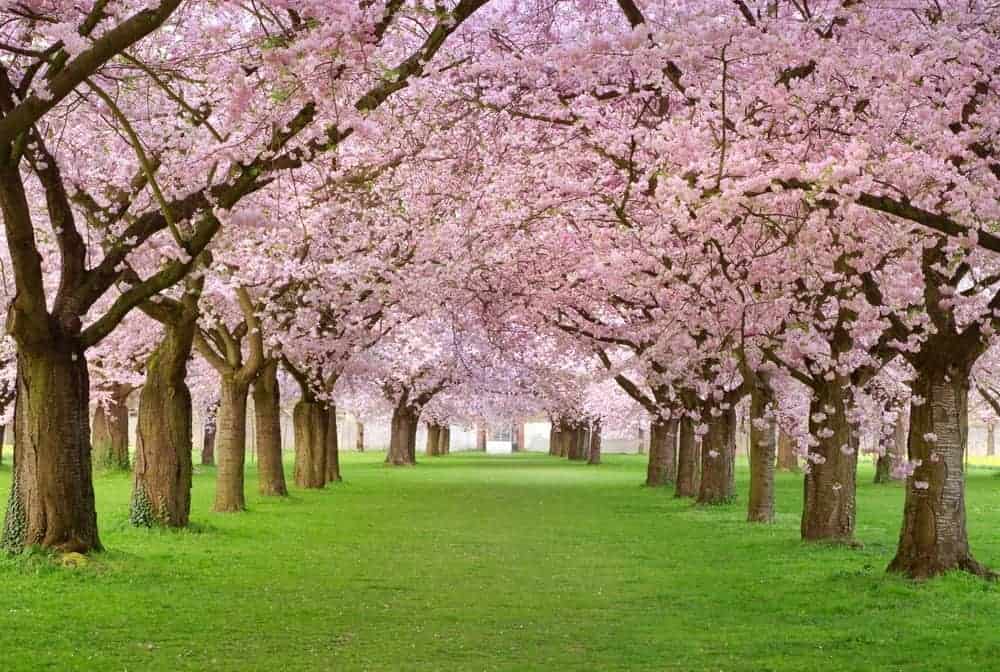
One of my earliest memories is standing on a wooden stool to grab a handful of cherries off the beautiful pink cherry tree in our garden.
I remember how the branches would bend and ache with the weight of the ripe, red fruit, and how easily the berries separated from the tree and into my hand.
Cherry trees still fill me full of joy – whether they are all dressed up in delicate pink blossoms, or offering me their fruit all summer long.
It’s no wonder that they have been lovingly painted by some of the world’s greatest artists, and decorative orchards can be found all across the globe.
The US is the second-largest cherry producer in the world, and cherry festivals are held in northern states (Michigan, Oregon, Utah, New York) and in the southern plains of Canada every April and May.
These cherry fairs are a great opportunity to stock up on ingredients and taste-test a few different cultivars so you can choose the perfect mix for your cherry wine.
There are dozens of different varieties of cherries, but they can largely be divided into two groups: sweet cherries and sour cherries.
You will know exactly which one you are tasting the second you bite down on it, although sour cherries also tend to give themselves away by sporting a darker, blacker color than their sweet cousins.
For this cherry wine, I like to use a 50/50 mix of sweet and sour cherries, as it adds a complexity to the wine which you wouldn’t otherwise have.
Having said that, I have also made an all-sweet batch in the past which works incredibly well as a dessert wine.
No matter what blend you go for, the one unbreakable rule when it comes to making cherry wine (or any fruit wine, for that matter) is quality.
Always choose the best cherries you can possibly find. They should be ripe and in season, and ideally produced organically at a reputable orchard.
I find that the darker the skin, the better the wine - you will get a lovely pink/red color in the end, and the extra tannin in the skin really adds to the fullness of flavor.
If you can, get out there and pick your cherries yourself. The fruit starts to appear in mid-Spring each year, and should start ripening by May or June, so keep your eyes peeled for local fruit farms where you can pick your own haul, or put on your hiking boots and go out in search of wild cherries, which can be found in sunny woodland glades or public parkland throughout the summer.
Pick your cherries from the end of the stemto avoid damaging the fruit, and pick as many as you possibly can – any extra cherries can be easily preserved in sugar syrup (for homemade maraschino cherries), in a jam, or in balsamic vinegar (for a zingy, fruity balsamic glaze). They can also be easily frozen without losing any of their flavor.
Always try to pick your cherries on a warm day when they are at their most ripe, and use a ladder (or cherry picker!) to get all the way to the top of the tree where the best fruit lives!
Alternatively, bulk buy organic cherries from your local market, stem-on if possible.
STEP TWO – Preparing your cherries
Six pounds is a lot of cherries, so it is going to take you at least an hour to prepare them all properly.
First, you need to sort through your haul and quality check each berry individually. If you find any over-ripe or mushy cherries, get rid of them immediately before they spread mold to the other fruit.
Under-ripe cherries are fine to use (as long as they aren’t green), and can be a handy substitute for sour cherries if you can’t find any of them.
If you notice a tiny hole in the skin of a cherry, discard it. Cherries are susceptible to fruit flies, which pierce the skin of the fruit and lay larvae inside the flesh. Needlesstosay, you don’t want to brew up a batch of baby flies along with your cherry wine…
Cherries are also a favorite snack for birds, who carry all sorts of diseases in their beaks. If it looks as though a chunk of fruit has been bitten out of your cherry, just discard it.
Once you have checked each one and removed the stems, you will have to start de-stoning each and every cherry (see, I told you this part would take a while…).
After my first attempt to destone 100-odd cherries by hand, I invested the princely sum of $5 on a cherry pitter, and I’ve never looked back.
Now when I have to pit a whole stack of cherries, I just put on the TV and enjoy the repetitive task. As you pit each cherry, drop it into your fermentation bin and discard the stone.
When all the cherries have been pitted, you can start to mush them up. You can use your hands, a spoon or a potato masher for this part – any method you like, as long as it helps release the juices.
Or you could simply stash your cherries in the freezer for a few hours, then allow them to defrost in your brew bin. The defrosting process will make the cherries mushier and easier to work with.
STEP THREE – Turning cherries into wine!

Now you should have a squishy, fragrant pile of cherries sitting in the bottom of your fermentation bin. It’s time to turn this fruit into wine!
Boil up approximately one gallon of water then bring it down to a simmer and add the sugar. Stir the sugar in until it has completely dissolved, then leave aside for ten minutes to cool.
Pour the entire sugar/water mixture over the cherries in the fermentation bin and stir, then leave it to stew overnight (or for 12 hours).
The next morning, add in the citric acid, wine yeast and yeast nutrient (following the instructions on the box) and stir, then cover the fermentation bin again and leave it for 24 hours.
The next time you check on the wine, it should be bubbling away furiously and a thick foam should have started to collect on the surface. This is good! It means your yeast is active and working. If you don’t see any bubbles after 24 hours, wait a little while longer then try using a different yeast.
Leave the cherry mixture to ferment in the brew bin for 5-7 days, stirring twice a day. When the bubbling and foaming has stopped, you can start thinking about the next step (although I would always wait an extra day or two just to be safe).
If you’re using a hydrometer, you should have a reading of around 1.095 by now, or 1.130 if you are aiming for a sweet dessert wine.
STEP FOUR – Straining day
Now it’s time to strain out all the cherry pulp and get your first look at the wine within.
Fit your straining bag or muslin cloth across the top of a large pot or sterilized bowl and slowly pour the cherry mixture over the top of it. Wring out the cloth a little so you release the last of the juices, then throw away the straining bag and pulp.
Now you need to move your wine into the first demijohn.
Using a sterilized soup ladle and your funnel, gradually move all of the cherry wine liquid into the demijohn.
If it doesn’t quite reach the top of the container, top it up with a combination of filtered or bottled water and sugar (in a 70/30 ratio) or with a little splash of unsweetened grape juice.
Then tap the bung into place until it is air tight, attach the airlock, and place the demijohn in a cool, dark place for 3-4 weeks.
You will know that it’s time to move on to step five when your airlock stops bubbling, and the wine inside the demijohn appears to be still. By now, you will probably also notice a thin layer of sediment collecting on the bottom of the container.
The next stage is all about ‘racking’ your wine to get rid of all this sediment (which is made up of dead yeast cells and fruits solids) so that all you are left with is the good stuff.
STEP FIVE – How to rack your wine
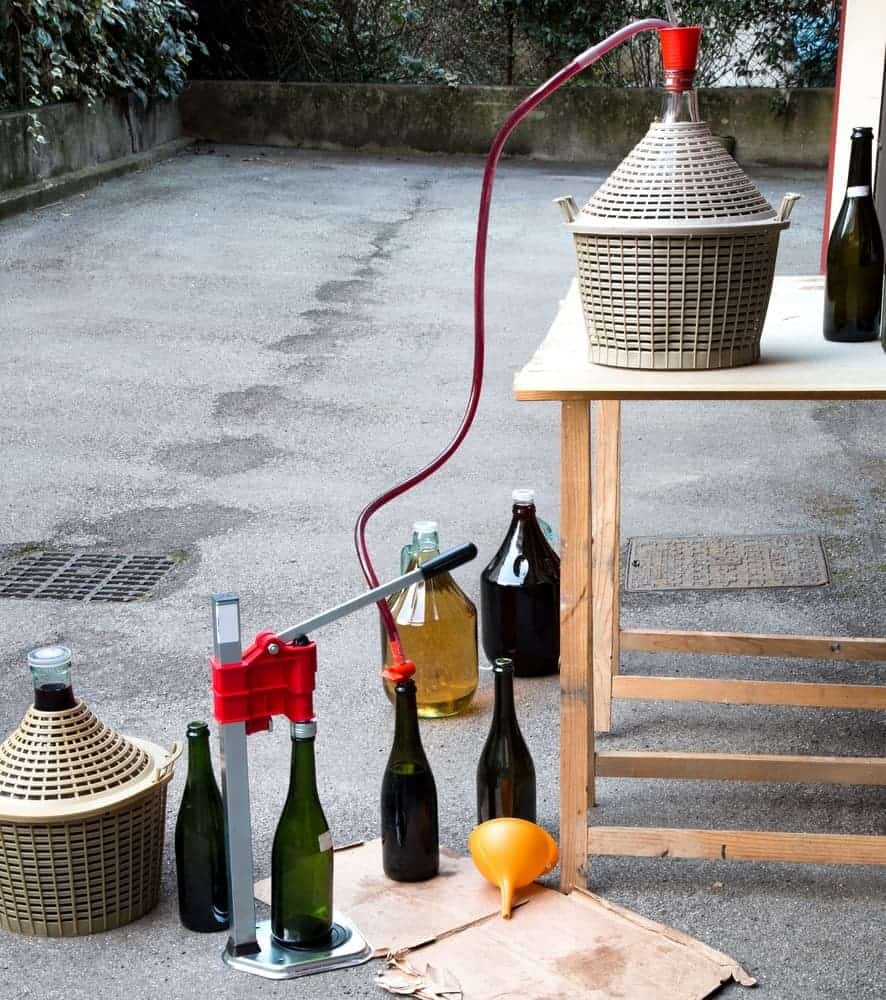
There is only one way to transfer your wine from one demijohn to another, without also transferring over all that sediment and gunk at the bottom. You’re going to have to rack it.
Before you start racking your wine, you will need to ensure that your siphon tube and second demijohn are both fully sterilized, and dried.
Then take your wine-filled demijohn out of storage and place it on a flat countertop or table top, taking care that you don’t accidentally disturb the sediment while you move it.
Place your empty demijohn on the ground below, then use your vinyl tubing to start moving the wine from one demijohn to the other. Lower the tube all the way to the bottom of the demijohn, without touching the sediment layer at the bottom.
Then suck hard on the other end (there really is no elegant way to do this!) and as soon as the wine starts flowing through the tube, start filling the second demijohn.
Get as much wine as you can into the second bottle, but avoid the sediment at all costs – if you do accidentally transfer a bit of sediment over, you may need to repeat the racking process a few more times to clear the wine completely.
Once the liquid has been transferred, put the bung and airlock onto your new demijohn, and put it into storage for another two months.
Then repeat the racking process again.
Your wine should be clear within 4-6 months (2 or 3 rackings), but if it isn’t, just keep on repeating this step until you have the clarity you want.
STEP SIX – Finishing your wine
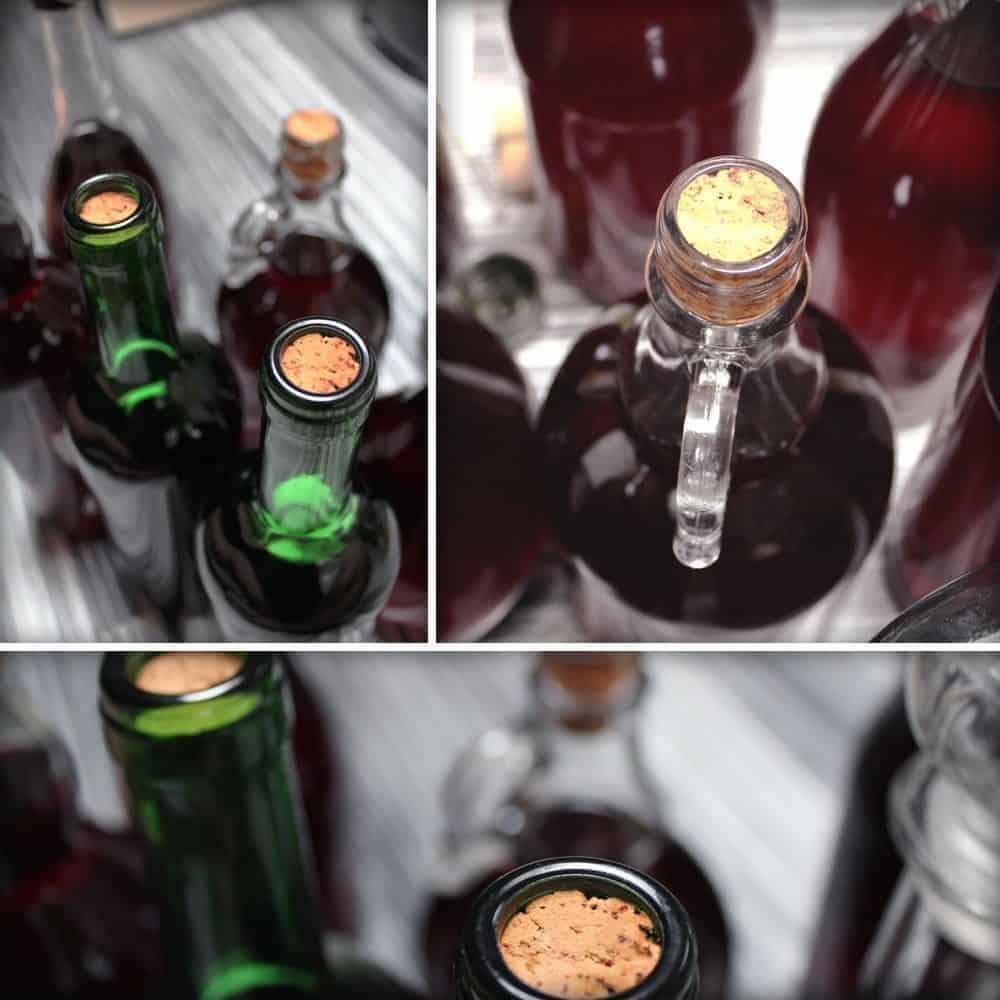
When your wine has been racked and cleared, you can start thinking about bottling up!
The bottling process is pretty similar to racking, except this time you’re transferring your wine into bottles instead of a demijohn.
Line up your bottles and use your vinyl tubing to get things moving. Within minutes you should have six full (or five full and one halfway full – you will lose a little wine every time you rack) bottles glowing pink with cherry wine. Perfection!
Secure and seal the corks and attach your own home-made label which lists the ingredients, the bottling date and the ABV (you can work this out yourself by taking a final gravity reading on your hydrometer and dividing it by 7.362).
Store your bottles somewhere cool and dark, away from direct sunlight.
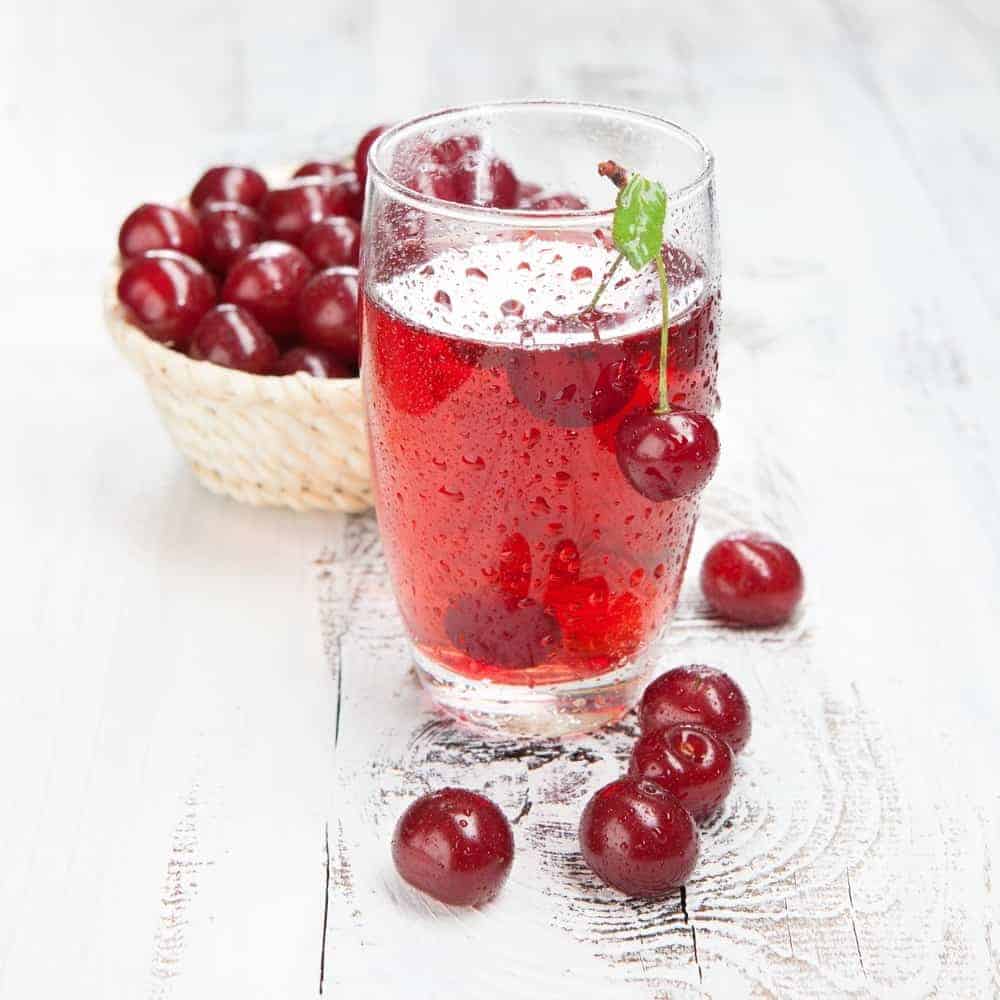
You can start drinking your wine within a couple of months, and this is actually one of those rare wines which tastes better when its young and still relatively sweet.
You can leave it to mature for a year or more, but try to drink it all within 18 months of bottling, as it really won’t improve in flavor after that.
Not that it will be terribly difficult to polish off one batch within a few months – this is an easy-drinking wine that works best as an after-dinner drink, or a fireside tipple in the depths of a cold winter.
Personally, I think there’s no better combination than a glass of cherry wine served at room temperature, with a handful of really good dark chocolate, but this wine also pairs well with sweets featuring marzipan, orange, coffee and vanilla sponge.
You could even use a glass of cherry wine mixed with powdered sugar and a drizzle of melted chocolate to create a boozy, shiny frosting for a chocolate bundt cake or a steamed pudding.
Cherries also go well with dark meat such as duck, pork and venison, so you could try adding a small glass of cherry wine to a game casserole or meat glaze to elevate your food to the next level – everyone will want to know what your secret ingredient is, and they’ll be so impressed when you casually mention that it’s “just a glass of cherry wine that I happened to make from scratch…no big deal.”
Get in touch and tell us how you will be enjoying your cherry wine – will you be drinking it with friends, or using it in rich meat dishes and decadent desserts? And will you be opening up your bottles as soon as you can, or leaving your wine to dry a little before consuming it?
We love to hear all about the wine-making adventures of our readers, so don’t be shy! Post any questions and advice in the comments box below, and keep checking back here for updates and new recipes that can help you to make the most of all your favorite fruits.
Conclusion
I hope you enjoyed making (and drinking!) your cherry wine. The full flavor and vibrant color of homemade cherry wine makes it a perfect gift, and a lovely addition to any drinks cabinet or wine cellar.
I like to decant mine into smaller bottles and hand them out to friends at Thanksgiving and Christmas – there is no better way to end a huge turkey dinner than with a glass of cherry wine and a selection of dried fruits and strong cheeses.
This is a rich and indulgent drink which deserves to be savored and respected – the perfect gift for the special people in your life.
Share your cherry wine experiences in the comments box below, and let us know how you’ll be drinking your first batch.
If you loved making your very own high-end wine from scratch, share this cherry wine recipe article with your friends and family so that they can get in on the secret as well.
After about 2 weeks most of the sugar will have been consumed by the yeast and fermentation will slow, making it easier to keep track of the falling sugar level of your wine. Tracking the sugar level will give you an idea of how your fermentation has been progressing.
Thanks for stopping by Chupacabras… those are good points!
Wow, cherry wine actually sounds really good right now. My husband and I have been testing out new wines every week and cherry has been my favorite so far. I’ll have to ask my husband if he’d want to go on a wine tour someday. I think that he might actually like it.
You should definitely give it a try Audrey!
hi, i followed your guide but when i put the wine in the demijohn there has been no bubbling but the wine is clearing. HELP
Hi Mark. Thanks for stopping by!
Before we go any further we need to determine whether the wine is really stuck.
1. Can you give confirm whether you have a good airtight seal on your airlock? If not, this might explain why you don’t see bubbles in your airlock.
2. What is the specific gravity of your wine? Have you taken measurements and are you sure that the SG is no longer falling? (ie indicating a wine that is stuck)
3. Are you fermenting in hot weather and/or a hot weather area?
4. Are sure that you have a good airtight seal?
If you’re certain about the steps above, there’s a couple of things you can try to get the yeast and fermentation process going again. Try them going down the list and trying them one by one to see if you see results.
1. Adjust the temperature of your wine. Simply warming your wine to 70-75° F for a couple of days will get the ball rolling.
2. Rouse the yeast by swishing or stirring – sometimes moving the yeast around in the wine will get fermentation going again.
3. Add some yeast energizer
4. Remove the old yeast by racking the wine, then re-inoculate with fresh yeast
Try that out, and see if you can get that to work! Let me know if you have any more questions and I’ll be more than happy to help out!
Hello Tim. I find this article interesting. You listed cherry puree as one of the ingredients, could that be a replacement for pitted cherries?